Last summer and fall my boyfriend and I did a lot of garage sale-ing in our new town. We'd see signs just about every weekend and found a lot of great cheap stuff. We got a color printer/scanner/copier/fax with cables and lots of cartridges for $50, as well as books, clothes, and other odds and ends. At one sale, we found a rattan ottoman that opened up to be a hamper. It was damaged in a few places, but it was $5. 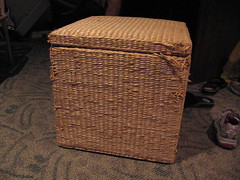

We've been using it as a hamper in the bedroom and since we purchased it, I'd intended to cover it. The inside is nice sturdy cream cotton, so that I'll let be. I checked what was under the rattan, but it was a very flimsy wooden board, so I chose to cover it, rather than take it off and start over. All I needed now was a staple gun and some fabric. A few weeks ago at Sears, my boyfriend steered me to the hardware section and we found a cheap, household duty staple gun for $11. Score! I was in business, finally.
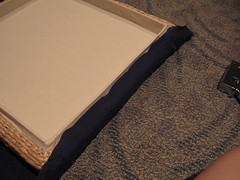
Tonight I set the hamper in the living room, under good light, and brought out an cheap fitted sheet. 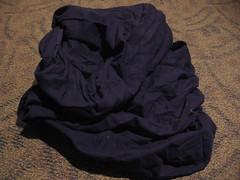
It's a dark blue K-Mart muslin cotton sheet. When I bought it, I had no idea that sheets less than $5 were no where near soft, even as 100 percent cotton. I used the set on a double-sized futon mattress, but donated them to my own fabric stash once I graduated from that bed. The sheet had more than enough fabric to cover the hamper.
The project didn't take much time or many tools -- just the light duty staple gun and staples ($14 total, I think), some fabric scissors and the fabric, and some regular scissors. 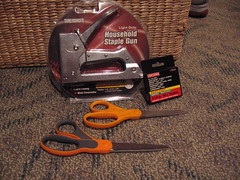
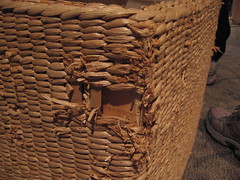
I used the regular scissors to trim any pieces of rattan that were sticking out and falling off of the hamper. I did it in less time than it took to wash and dry one load of laundry. It's so easy, anyone could do it (but of course be careful with the staple gun and other sharp things).
With the fabric generously draped over the closed hamper, I cut enough all the way around it for the lid -- just about an inch or less bigger than I needed so I could fold the ends under. I set the big square-ish circle on the floor and set the lid, upside down, on top of it. I stapled one side in a few places, then stretched out the fabric so it was tight and stapled all the way around. This took a few more steps of folding the corners and checking the other side so that I had enough to spare and the top was tight, etc, but you get the picture.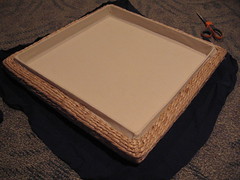
For the body, I basically took a random part of the big "O" shaped piece of sheet I had left and stapled it to the upper lip of the hamper. Then I wrapped it around, stapling it at the top and bottom as I went, right on top of the rattan. This took some finagling, as I'd ended up stapling the fabric on the bias, but I did some creative snipping with the fabric scissors and folding edges under, and it all turned out OK. On two sides, one corner has staples going up the side (I tried to make it look as stylish as I could) to connect the two ends or hide where I had too much oddly angled fabric and had to fold it under. But it looks nice, even though it's not perfect.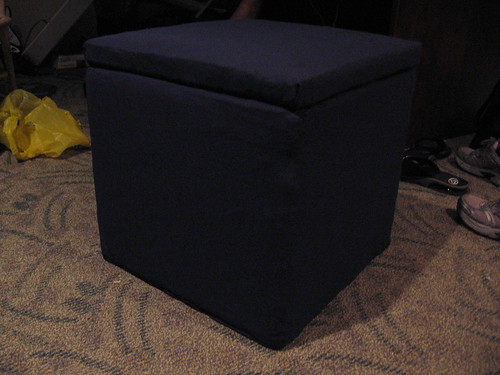
Because the sheet is sort of see-through (it's the same fabric I used for covering the wicker table pedestal, which I'd tried out as curtains that were too translucent), you can see the texture of the rattan when the light shines on it. I actually like that, since it's covered in a pretty dark blue hue. I'm not sure what storage ottomans cost new, but even at Target they've got to be at least $20, right?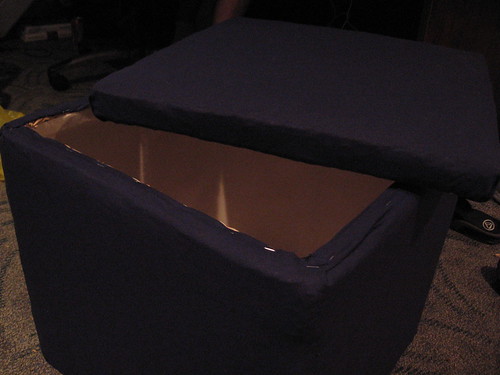
Now it matches the table, as well as one set of bed sheets (nice, soft ones) that are dark blue. I think we have a dark blue and sage green theme in the apartment -- the sage was already here, but the dark blue looks nice with it, so it isn't a bad color situation to fall into.
:-)
Tuesday, February 12, 2008
Easy Make Ottoman (or hamper)
Sunday, February 10, 2008
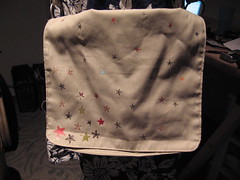
New camera case!
I spent a nice, but relatively quick chunk of the afternoon today sewing up my birthday gift from my boyfriend. He found a cute camera case pattern on Craftster.org and gave me a printed out copy of the tutorial, along with a promise to buy me the fabric and notions for it.
We went to Kaimuki Dry Goods in Honolulu for the fabric, which ended up being a pretty Asian print in blues, pinks, and light brown. I had wanted to get some Amy Butler fabric, but I was drawn to this one. I got some light blue flannel for the lining, too.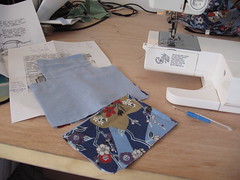
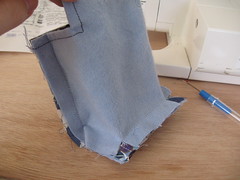
There are really only two pieces to the case because the lining and the outside are identical. I made it as the tutorial said, but at the end I added a pocket on the side for extra batteries -- mine only takes two AAs, so they fit on the side just right. 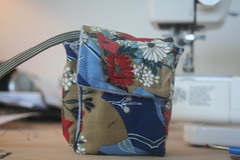

I wish I'd done this before I sewed it all up, though, because it made attaching it that much harder. But it worked out alright in the end. I closed both the pocket and the case with sew-on velcro. There are more pictures on my Flickr.
The only thing I would've done differently, other than sewing on the pocket before I did the seams, was to make it sturdier. It works fine, but could have more padding, either with a heavier fabric, interfacing, or batting. But it's pretty and I don't usually throw it around much anyway, so it'll be OK. Also, I have a good deal of fabric left (thanks to me over-calculating how much I'd need (I'm awful with guesstimating how much I need without a definite pattern that says, "Buy x yards," so I generally overestimate to be on the safe side), so I plan on putting it to use in the tote bag I've been wanting to make for toting things to work (lunch, books, etc). On that project, I'm still not sure if I'm going to search for a pattern or just make one up.
Tuesday, January 29, 2008
Frugal Fashion!
My friend Kacie is the writer of a great blog about being frugal. One of her recent posts was about a giveaway she's doing. The prize? A book about being a frugal fashionista. I put myself in the running for it, of course, although I don't consider myself a fashionista by any means. But I do love clothes and style -- and I hate paying full price for any of it. That's why I sew and alter my clothes, as well as shop thrift stores and sale and clearance racks almost exclusively, except when it's an item I just can't get anywhere else -- like comfortable shoes that won't kill my feet (I'm not a cobbler and cheap shoes, even from my beloved Target, have always let me down).
Anyway, even though I don't need another book, it's fun to support Kacie's blog and her giveaway. So head on over there and put your hat in the ring for one of the many giveaways she's having -- or just explore all the great advice and community she's developed in a mere few months of blogging and living a frugal lifestyle. She's a great writer, to boot.
And speaking of fashion (er, well, clothes, at least), I am planning on getting to my "to alter" clothes pile very soon, and I'll post about what I make. I'm also trying to come up with some posts about basic sewing stuff and how-tos, per a few friends' requests. Soon, I promise!
Saturday, January 26, 2008
Homemade journals
Two of the people I made Christmas presents for were K's sister R and my cousin M. They are 20 and 18, respectively, and are both good with words and artsy stuff, yet in different ways. So I decided to make them both journals for Christmas. Because they're so different, I didn't want to make them the same item at all. And because it was homemade, I wanted it to be a really cool journal that you couldn't buy in stores.
I found lots of great ideas and instructions for making journals here, here, here, here, and here, and although they were all lovely, I wanted mine to be different.
I went to my local craft store and went to the scrap-booking aisle. I perused this aisle probably twice for at least thirty minutes at a time before I made my decisions. I bought packets of additional scrapbook pages -- the kind in plastic sheets that attach to the cover with pegs -- and I bought stacks of printed cardstock pages. I fell in love with the Amy Butler paper, of course, and I found cool rock'n'roll patterns, too. I also stocked up on glue and chip board for the covers themselves.
Basically, I followed the instructions for the technical stuff when making these, except I made them bigger. I made R one that was eight inches by eight inches -- I found scrapbook pages that were already this size, and just made a spine that was wider than called for in most of the tutorials. I made M's eight and a half inches by five and a half inches -- I just folded a bunches of regular sheets of paper in half. Both times I made signatures and sewed them together, but I also glued them to the spines, as was recommended in one of the tutorials. I had to cut R's paper to a special size, but it wasn't that big of a deal. As for making the holes in the paper and signatures, though -- use a hammer and nail if you don't have any of the fancy bookmaking equipment called for. I tried to use a thumbtack and ended up cutting up and bruising my hands. I used the chipboard for the covers, and covered them in fabric. Before I glued it on, I sewed pieces of paper to the fabric to decorate it -- I cut out shapes of their first initials and other pieces. I used pink-patterened Amy Butler paper for R and swirly rock'n'roll inspired paper for M.
Here's R's cover, after I sewed the paper on and before I glued it to the chipboard: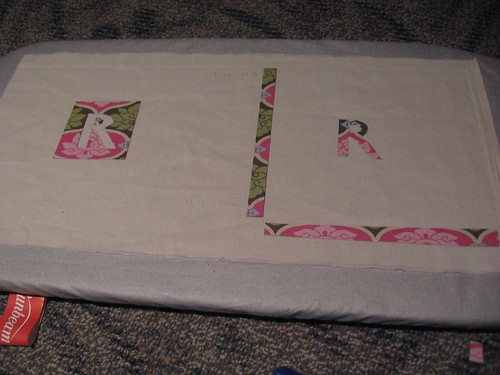
I thought the best part of my journals was that I used those scrapbook pages so that they could have pockets to store notes, pictures, or whatever else they wanted to. I switched out the blank white inserts with colored paper from the cardstock stacks, cut to fit. I had sewn in the pockets along with the signatures and paper, so they're just as snug as any other sheet. They also act as dividers, if they want them to be, because they're easy to flip to.
They both loved them. My only regret with R's was that I ended liking the back cover better than the front. She did, too, but she's left-handed, and it turns out she prefers to write from the back to the front, anyway. So the back is sort of the front now on hers. :-)
Unfortunately, despite swearing that I took pictures of this process and the finished products, I can't find any more pictures of these journals. I'm going to ask their recipients to send me pictures of them. I'll post those when I get them. And despite being time consuming and frustrating at times, it was really fun and a good challenge -- they looked really cool at the end. I really love journals anyway, and lucky for me, both R and M do, too.
Pedestal table slipcover
Today I'm waiting for K to finish up some work (on a Saturday :-() so that we can go out and run some errands. It's taking longer than expected, so I've decided to fill the waiting hours with easy and simple crafty projects.
The curtains in the bedroom are sage green sheers -- cheapy ones from Wal-Mart. They are fine, but they're too see-through for me, even with the mini-blinds behind them. So I took a double flat sheet and snipped the stitches on the edges of the top part of it. This opened up the folded over decorative edge and made it into a pocket I could feed onto the curtain rod. I thought it looked cool, because it was one huge piece of dark blue fabric, but K didn't like that it didn't open in the middle and that the fabric pooled at the floor because the sheet was really long. So my curtain project is on hold, as I also discovered that they weren't as opaque as I'd thought. They let in all sorts of light this morning.
So I took the sheet down and made it into a slipcover-like thing for our dining table. The table is just a gigantic piece of glass over a wicker pedestal. I like pedestal tables, but I hate wicker. And our entire collection of apartment furniture is... wicker. The glass is also annoying, as it gets dirty a lot and sticks out far, making it a bigger table than we need, very heavy, and easy to accidentally run into. But it does easily clean (very often) with Windex.
I draped the sheet over the table. Some of the corners pooled on the floor because it was too long, and other ends stopped halfway down. So I laid it out on the floor and measured the pedestal. It is 29 inches in diameter and, including its waist-like shape, is about 31 inches in height. I added that all up and proceeded to cut a big 91 inch circle out of that sheet. Of course, it wasn't quite 91 inches square -- it was more like 92 inches by 79 inches. But I measured to the center using the radius of what I wanted the fabric to be (45 1/2 inches, which I rounded to 46 so it used up that last inch of the sheet's length). I marked it and measured outward around the sheet in a circle. Of course when I got to the short end I ran out of fabric to mark on, but I fixed that for the most part a few minutes later.
I cut it out, following the chalk markings, and realized it may have been easier to mark the center and then fold it in half and in quarters with the dot as the center (rather than the center of the fabric as the center). I'm not sure if my logic is working on that, but since I was trying to make a symmetrical object, I thought that would be smart. Anyway, the fabric was a circle except for one side, which was about 13 inches too short. I took the scraps from the corners I cut off and sewed one onto that side, the long, curved edge to the straight, uncut edge. It added more than 13 inches to it, but only in the middle, because the corner piece was, well, a corner piece, and sort of a triangle shape. I didn't feel like sewing on more, so I put it on the pedestal to see how it looked so far and arranged the folds of the fabric so that you can't see the wicker where the short gaps were. It looked pretty good, and you have to look hard to realize I put minimal effort into it. I tied it with a cream grosgrain ribbon and put clear nail polish on the ends.
And voila!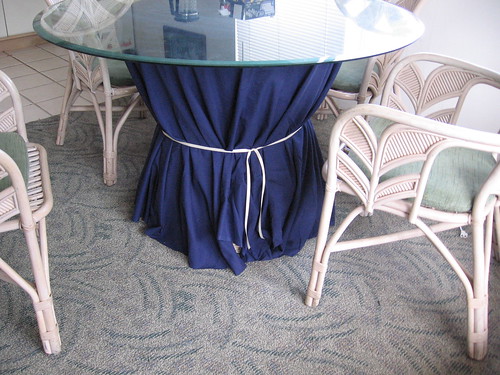
It looks much better, I think. I had been thinking of this for a while, but never thought about color. I love blue, so I like it, but I have no idea if that is the color I wanted for the dining table. I think someday I'm going to cover those chairs, too, so perhaps I'll choose a lighter color that matches this dark blue.
Monday, January 21, 2008
The newest addition to my creative arsenal
I have very exciting and big news.
It's not a new sewing machine -- it's better. It's a project desk!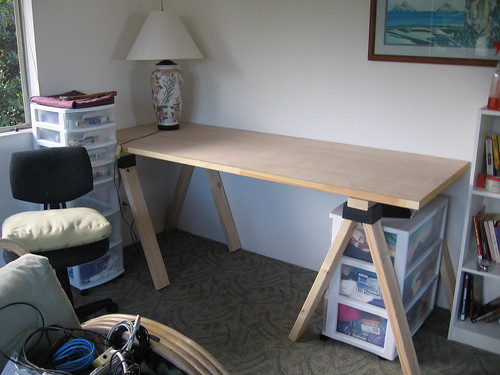
I've been dreaming about this desk since September, I think. On Saturday K and I went to Hardware Hawaii and got a 30 inch by 80 inch hollow core door. Last Sunday we got the 2x4s and had them cut at Home Depot in Pearl City. My parents gave me the sawhorse brackets for Christmas. I'm not sure how much the sawhorse brackets cost, but I can't imagine much, because they only consist of heavy-duty molded plastic and the bolts to secure them together.
The 2x4s were $1.99 each, untreated pine (I think). We got five pieces of lumber, but we calculated that we really only needed four, because our math was wrong and the legs ended up shorter than we originally thought. The lumber was around 90-something inches long, so we could have gotten three of the 30-inch legs out of each (we needed eight total), but we had calculated the legs to be 38.9 inches -- too tall. I wanted it to be a standard height desk of around 30 inches. Despite the angle of the legs making it less than 30 inches tall, the brackets, crosspieces, and the door make the table just under 32 inches tall. So it's a little taller than a standard desk, but it works well and is great for standing up and sitting down work.
The door was a plain, unfinished hollow core door. We got it for $37 at our local hardware store, but it was cheaper at Home Depot for $30. However, it would have cost us more money to have it delivered ($75), use their "you haul it" truck ($20/hr), or borrow K's boss's truck and drive 30 minutes each way (figuring in gas and time). So paying $7 more and hauling it ourselves in that truck was way cheaper, as the hardware store is about three miles away.
I only had to drill four holes for the bolts to fit into, so assembling this was easier and faster than any store-bought piece of furniture (we've assembled two in the last few months). Someday I may paint, stain, or varnish the door and/or legs, but for now I like them bare. If I ever paint or glue on the table (quite likely), it will get the spills, splashes, and remnants of those projects. I like that idea.
So I paid about $47.75 for the desk, not including the brackets, which I doubt would add much to the cost. So cheap, and I saved a ton over every other possibility I found on the internet. It's easily taken apart -- the door is very light because it's hollow. We carried it out of the store ourselves.
I'm so excited about this desk. I haven't put much on it yet, except for my computer, my sewing machine, and a lamp in the far corner. Underneath I put a three drawer rolling chest full of fabrics and yarns. It fit nicely underneath one sawhorse and is easy to get to and see. On the other side I have a basket of patterns and a bag of current yarn projects. The desk is perfect for what I need. My computer, possibly with a pattern or instructions, can sit on one side, while my sewing machine or other project will have plenty of room on the other. And you know what? My dressform (which I'm trying to think of a name for) looks great standing next to it. It feels like my creative space now.
:-)
Now if only I could find the time to catch up on posting about the crafty projects I have completed and start on my new ones....
D(ecorate)IY Messenger Bag
So my craftiness has been nil lately. I still have Christmas projects to post about, but first I'll post about something I worked on recently (that was a Christmas gift) and I'm continuing to work on.
K's grandma gave me a bunch of sewing notions for Christmas, as well as a small tan messenger bag that came with embellishments you could add on. I sat down with it last Sunday and had some fun cutting out the iron-on transfers and designing it. This is what I came up with: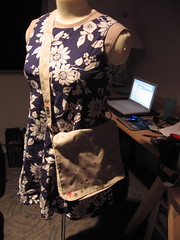
The transfer sheets had all different shapes, patterns, and themes, but most of them included stars, so I made a pattern of stars falling from the upper right to the lower left. I mixed all the colors together and designed it so the stars were closer together at the bottom, like they were collecting in the corner. I like it. :-)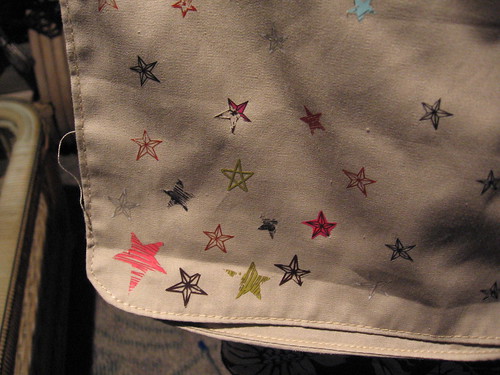
For the shoulder strap I used one of the fuzzy letters for my initial and two of the swirly transfers to give it some color.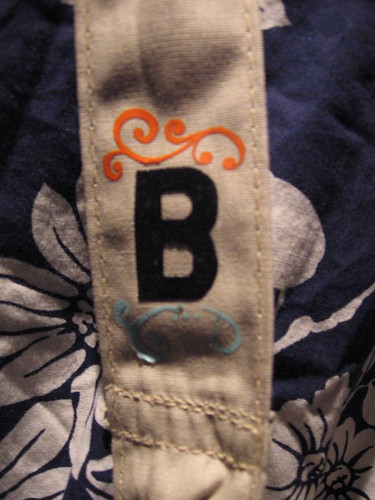
My only complaint about the bag is that the fabric is very lightweight, so it doesn't have a lot of structure. It is a small bag, so it's unlikely, especially as I'm no longer a student, that I would be carrying around big rectangular books and notebooks in it that would give it a good shape and some stability. I'm going to put a lining in it with a sturdier fabric. I'm not yet sure what the fabric will be -- perhaps I don't have it yet. But I think it'll contrast or compliment nicely with the star motif and tan color. Once that is done I think I'll get a lot of use out of it. I really like this project, as it was a gift, but I still get to alter it and add my own personal touches because that is the spirit of the item. :-) Thanks, K's grandma!


